Writing Sensory-Motor Loops in ROS
Today
- Follow-Up on Nodes and Connecting to a Neato
- Writing Sensory-Motor Loops for a Neato
- Project Work Time
For Next Time
- Work on the the RoboBehaviors Project, due Sept 23rd at 7PM!
- If you haven’t already, please list your team and add a link to your project Github on the Teaming Sheet, and update the Canvas Teaming Page.
- A rubric for the project is available on Canvas.
- We will have a shareout for the project on Sept. 22nd in class (with a short deliverable).
- Work on the Broader Impacts assignment Part 1, due on September 26th at 1PM.
- We will have a class discussion on Thursday 25th in-class!
Day 2 Recap and Connecting to Neatos
As part of this recap, let’s actually engage with some Neatos first. Get in your project groups and grab a Neato and battery pack from the cart. Then follow the
ros2 launch neato_node2 bringup.py host:=IP_OF_ROBOT
Uniqueness of Node Names
ROS2 Nodes should have unique names. There is support for changing the node name when launching a node (or specifying a unique name in the launch file). If you start two nodes with the same name, the system will allow you to do it, but you will get a warning that things might go bad (ominous!). For example, I can set the name of the teleop node as follows.
$ ros2 run teleop_twist_keyboard teleop_twist_keyboard __name:=my_name
You can verify this worked, by running the following command.
$ ros2 node list
Listening to ROS2 Traffic
We discussed multiple ways to diagnose whether your publishers are operating as expected; any of the following commands can get you to interfaces that verify that your topic is publishing and that the information appears correct:
$ ros2 topic list
$ ros2 topic echo /topic-name
$ rviz2
$ rqt
How do we know if our subscribers are working? Well, we can see if the node is initialized by running:
$ ros2 node list
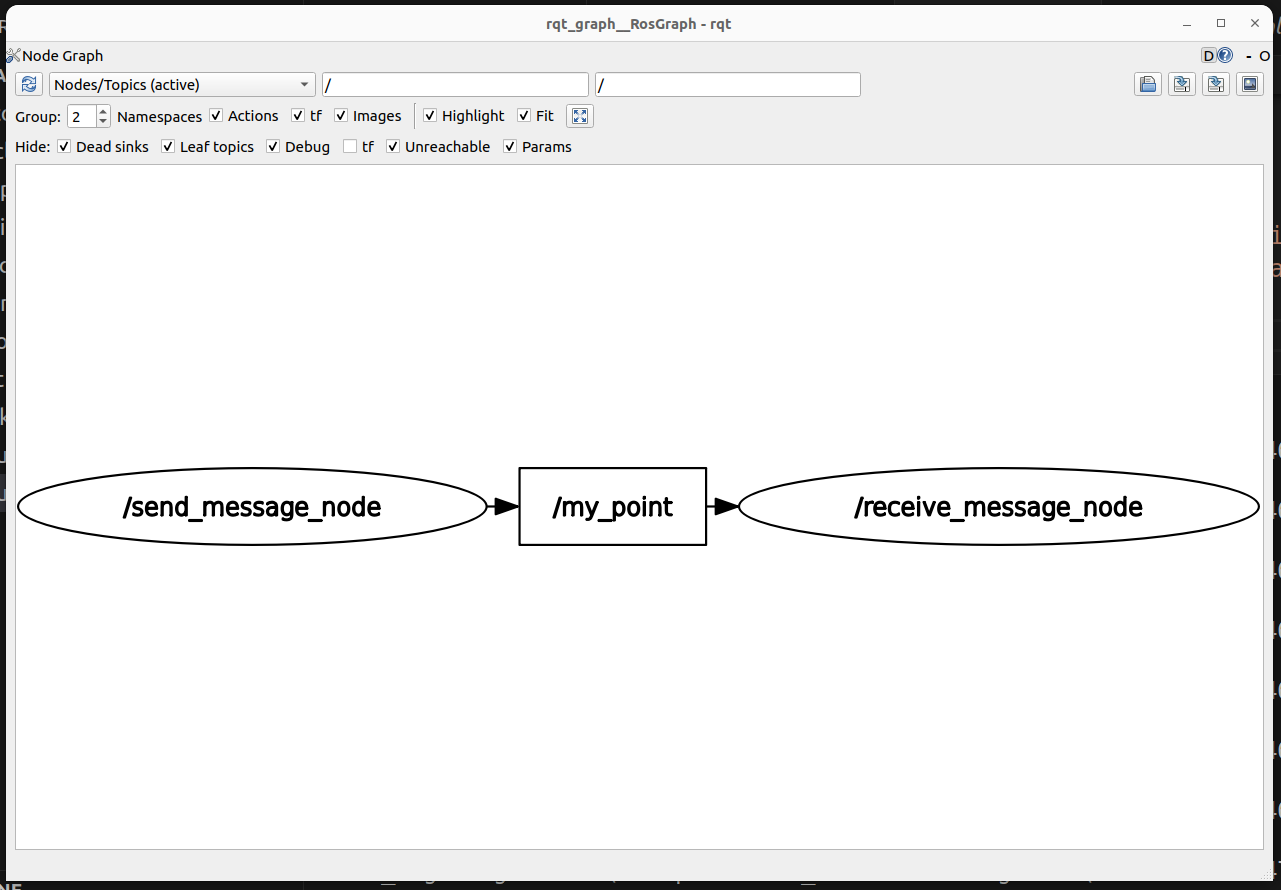
But if we want to know whether the node is receiving data properly, we’ll need to add code in our subscribers that will either print messages to terminal (for manual inspection), throw time-out errors if we don’t get any messages (and expect to get some within certain windows of time), or record rosbags for later debugging. You can also consider adding tools like ros2doctor (https://index.ros.org/p/ros2doctor/) that can perform some diagnostic functions on your ROS2 network. And you can check if all the message “plumbing” looks right by using the utility rqt_graph:
$ ros2 run rqt_graph rqt_graph
which will show you a map of your nodes and messages:
Sensory Motor Loops
One way to think of the intelligence that drives a robot is as a sensory-motor loop.
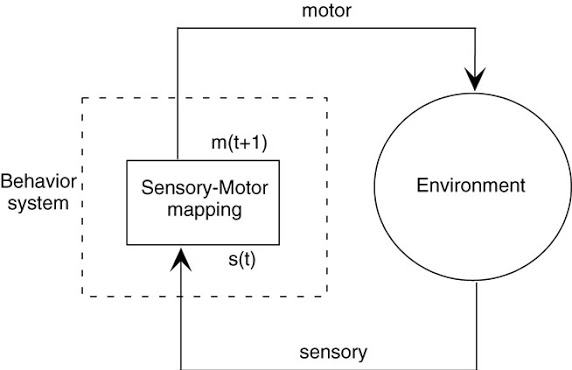
Today, we will be building on the basic ROS nodes we wrote last time to create a ROS node that both integrates sensory data (through subscribing to a topic) and outputs a motor command (by publishing to a topic). Perhaps one of the first things you should always consider when working with a robot, is how to keep it, and you, safe. Let’s build some software-side emergency stop features,
Creating our First Sensory Motor Loop
Sample solutions to this can be found in the
class_activities_and_resourcesGithub repository underin_class_day03_solutions. (if you are looking for the C++ solutions, look in the directoryin_class_day03_cpp_solutions).
Find another person in the class to work with. If you’re paired up for the warmup project, consider working with that person. In pairs, you will begin to explore the idea of a sensory-motor loop on the Neatos.
Create a Package
In order to get started, create a package for the code that you will be writing today. As with all ROS packages in your workspace, it must be inside of your ros2_ws/src folder. Besides this requirement, you are free to put the package anywhere.
$ cd ~/ros2_ws/src/class_activities_and_resources
$ ros2 pkg create in_class_day03 --build-type ament_python --node-name emergency_stop --dependencies rclpy std_msgs geometry_msgs sensor_msgs neato2_interfaces
Bump Emergency Stop
The first sensory-motor loop we will create is one in which the robot moves forward at a fixed speed until it senses an obstacle (using the bump sensor) and then stops. For a rundown of the bump sensors on the Neato, check out the
Hints:
- You need a way to access the bump sensor data, and once you have that data, tell the Neato what to do with certain inputs. Consider listing out what you need to subscribe to, and what you need to publish to start.
- Assuming you are using classes to define your ROS nodes, you can create a class attribute (
self.attribute_name) to share data between class methods.
If you execute the ros2 pkg create command given above, there should already be a file called emergency_stop.py created for you. If you placed your package in ros2_ws/src it will be located at: ~/ros2_ws/src/class_activities_and_resources/in_class_day03/in_class_day03/emergency_stop.py. You can use our work from Day 2 to get started writing your nodes as well.
Proximity Emergency Stop: Using the Laser Range Finder
The next sensory-motor loop that you create should be called distance_emergency_stop.py. In order to add this node, you will have to modify the setup.py file in your in_class_day03 package (like we did on day 2 with our receive_message node).
The distance_emergency_stop.py node should be identical to emergency_stop.py except it should use the laser range finder to detect when an obstacle is within a specified distance and stop if this is the case. It is up to you how you implement this. You can either use just the measurements in front of the robot, or perhaps use all of the measurements. You may want to use an all-or-nothing control strategy (also called bang-bang) where you are either going ahead at some fixed speed or you stop completely. Alternatively, you may use something akin to proportional control where your speed slows proportionally with how close you are to the target distance. Again, for more detail on using the Neato sensors (including the laser range finder), see the
Once you implement this, you may consider using the command line tool rqt to add a visualization of the laser scan data. This plot shows scan/ranges[0] (the measurement straight ahead). For a 0.5m target distance, here is what rqt may show:
![A plot that shows /scan/ranges[0] converging to the value of 0.5](../website_graphics/rqt_laser_range.png)
Going Further: Basic Behaviors
With the time you have remaining in the class, and with your project partner(s), please have a look at Day 2 Going Further and complete the exercise (if you haven’t already). Make sure to develop any code in the package you specifically create for the RoboBehaviors and FSM project.
Following the same process as above, consider a new behavior: driving in a square. Create a new script that captures this type of behavior, following the instructions in the Project Description.
Hint: Feeling stuck? Have a look at some sample code…